Instructions to Modify Older Cow Pi mark 1 designs to mark 1e/f
If you have an older breadboard-based Cow Pi circuit, you can modify it to a current design.
Important
If you previously installed the CowPi library version 0.4.1 or earlier (i.e., Spring 2023 or earlier) then you will need to manually uninstall the library and re-Install the CowPi and the CowPi_stdio Libraries.
CowPi (and CowPi_stdio) library versions 0.5.0 and later will automatically update.
Note
If you have the Cow Pi mk1a (i.e., Fall 2021 class kit), mk1b (i.e., Spring 2022 class kit), or mk1c and need the Cow Pi mk1f (i.e., Fall 2023 class kit) then we recommend that you go to the EE Shop to purchase an LCD character display with I2C adapter for $5, fully disassemble your existing kit, and re-assemble it using the Cow Pi mark 1f Construction Instructions (Arduino Nano form factor, I2C communication).
If you have the Cow Pi mk1d (i.e., Fall 2022 and Spring 2023 class kit) then follow the instructions below.
Manually Uninstall Older Library Versions
The CowPi library’s version 0.4.1 and earlier required manual installation. The CowPi and CowPi_stdio libraries’ version 0.5.0 and later can be installed from the Arduino Library Manager and the PlatformIO Registry, and they will automatically update to the current version because of that. But first, you must manually uninstall any versions of the CowPi library that you had manually installed.
- :[ ]:
Using your file browser or command line, navigate to:
- Windows:
C:\Users\▶username◀\Documents\Arduino\libraries
- MacOS:
/Users/▶username◀/Documents/Arduino/libraries
- Linux:
/home/▶username◀/Arduino/libraries
- :[ ]:
Delete the CowPi directory
- :[ ]:
Update a Cow Pi mark 1d
An update in the CowPi library version 0.5 eliminated the need for the 74LS20 Dual 4-input NAND Gate IC and obsoleted the mark 1d.
Did you modify your Cow Pi for the Spring 2023 Group Project?
I have some good new and some bad news.
The good news is that last semester’s Group Project had you remove the wires between the NAND chip and Arduino Pins D2 & D3. So that’s done! 🙌✊🥳🎉👏
The bad news is that last semester’s Group Project also had you remove the right pushbutton and its wires. ಠ︵ಠ
You can try these steps:
- :[ ]:
Remove the Group Project’s ultrasonic echo sensor and its four wires.
- :[ ]:
Remove the Group Project’s piezoelectric disc and its two wires.
- :[ ]:
Consult page 29 of last semester’s prelab to re-insert the right pushbutton and its wires.
If you were able to complete those steps successfully, then after you Manually Uninstall Older Library Versions and Install the CowPi and the CowPi_stdio Libraries, Load the I/O Test Code to confirm that all inputs and outputs function correctly.
If you were not able to complete those steps successfully, then fully disassemble your existing kit, and re-assemble it using the Cow Pi mark 1f Construction Instructions (Arduino Nano form factor, I2C communication).
If you did not modify your Cow Pi for the Spring 2023 Group Project
An update in the CowPi library version 0.5 eliminated the need for the 74LS20 Dual 4-input NAND Gate IC and obsoleted the mark 1d.
- :[ ]:
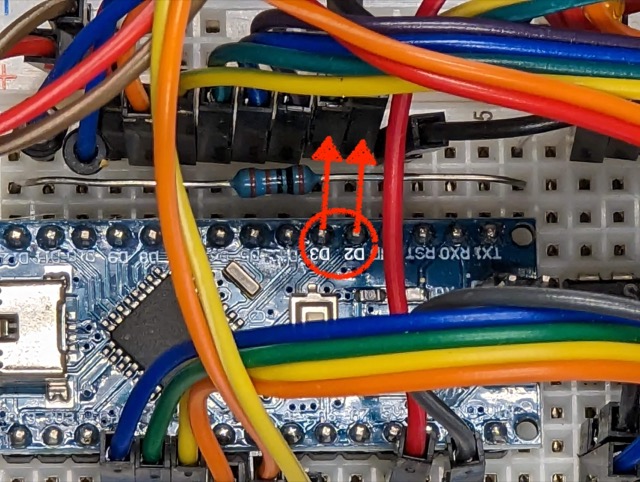
Locate the wires connected to the Arduino Nano’s pins D2 & D3. They are in breadboard contact points j10 & j11.
- :[ ]:
Gently remove the wire in the breadboard’s contact point j10
- :[ ]:
Gently remove the wire in the breadboard’s contact point j11
- :[ ]:
Very gently tug at those two wires to completely remove them from the breadboard
Your circuit is now functional as a Cow Pi mark 1f. The NAND chip is still in the breadboard, but it no longer drives Arduino pins D2 & D3. After you Manually Uninstall Older Library Versions and Install the CowPi and the CowPi_stdio Libraries, then Load the I/O Test Code to confirm that all inputs and outputs function correctly.
Update a Cow Pi mark 1a
The Cow Pi mark 1a design became obsolete after we discovered inadequate tolerances in the SPDT slide switches’ construction allowed a momentary shorting of power to ground, placing the microcontroller in a brownout state. This was resolved in the mark 1b by treating the slide switches as SPST and reconfiguring the microcontroller’s pins accordingly.
- :[ ]:
Remove the wire that connects breadboard contact point e31 to the upper power (+) rail.
- :[ ]:
Remove the wire that connects breadboard contact point e31 to the upper power (+) rail.
- :[ ]:
If you had to remove any other wires for the previous steps, return those wires to their original positions.
Your circuit is now a Cow Pi mark 1b. Proceed to follow the instructions to update a Cow Pi mark 1b.
Update a Cow Pi mark 1b or mark 1c
The Cow Pi mark 1b was not obsolete when the mark 1c was introduced – they differ only a few details of construction. These differences are so that the Cow Pi mark 1c and mark 1d share as many construction details as possible, making exceptions only to allow for wiring the mark 1c to communicate via SPI and the mark 1d to communicate via I2C. An update in the CowPi library version 0.5 eliminated the need for the 74LS20 Dual 4-input NAND Gate IC and obsoleted the mark 1b and mark 1c.
- :[ ]:
Locate the wires connected to the Arduino Nano’s pins D2 & D3. They are in breadboard contact points j10 & j11.
- :[ ]:
Gently remove the wire in the breadboard’s contact point j10
- :[ ]:
Gently remove the wire in the breadboard’s contact point j11
- :[ ]:
Very gently tug at those two wires to completely remove them from the breadboard
Your circuit is now functional as a Cow Pi mark 1e. The NAND chip is still in the breadboard, but it no longer drives Arduino pins D2 & D3. After you Manually Uninstall Older Library Versions and Install the CowPi and the CowPi_stdio Libraries, then Load the I/O Test Code to confirm that all inputs and outputs function correctly.