Install the CowPi and the CowPi_stdio Libraries
Cow Pi mk1e: Arduino Nano form factor
You will need to install the CowPi and the CowPi_stdio libraries. The instructions differ, depending on which IDE you are using:
Install the Libraries for the Arduino IDE
The library manager can be accessed either from the top menu bar (File ⟶ Manage Libraries) or from the side menu bar (select the icon that looks like books standing on a shelf).
- :[ ]:
Open the library manager.
- :[ ]:
In the library manager’s search bar, type “CowPi” (without quotation marks).
The results will be the CowPi library and the CowPi_stdio library.
- :[ ]:
Click the “Install” button for the CowPi library.
You will see a pop-up window telling you that you also need to install the CowPi_stdio library (Fig. 27).

Fig. 27 Installing both libraries can be achieved by installing the CowPi library and its dependency.
- :[ ]:
Click the “Install All” button.
If you err and select “Install Without Dependencies” then you can still install the CowPi_stdio library separately.
Load the I/O Test Code
- :[ ]:
From the Arduino IDE’s File menu, open the io_test example: File ⟶ Examples ⟶ CowPi ⟶ io_test
- :[ ]:
Open your IDE’s Serial Monitor.
- :[ ]:
Compile and upload io_test to your Arduino Nano in the same manner that you did for MyBlink.
After io_test has been uploaded to your Arduino Nano, hou will see this message in your IDE’s Serial Monitor:
CowPi library version 0.6.0
The simple I/O test will print the status of the keypad and of each
    button, switch, and LED every time there is a change.

Keypad:      -        Column pins:  1111
Left switch: RIGHT    Right switch: RIGHT
Left button: UP       Right button: UP
Left LED:    OFF      Right LED:    OFF
For now, no other output is possible.
After the libraries are installed and the test code is loaded, proceed to Install the Slide Switches.
Install the Libraries for PlatformIO
You do not need to explicitly install the libraries; we will specify their use in platformio.ini files, and PlatformIO will automatically download them.
Load the I/O Test Code
- :[ ]:
In the PlatformIO Home, under “Quick Access,” click on the “+ New Project” button.
- :[ ]:
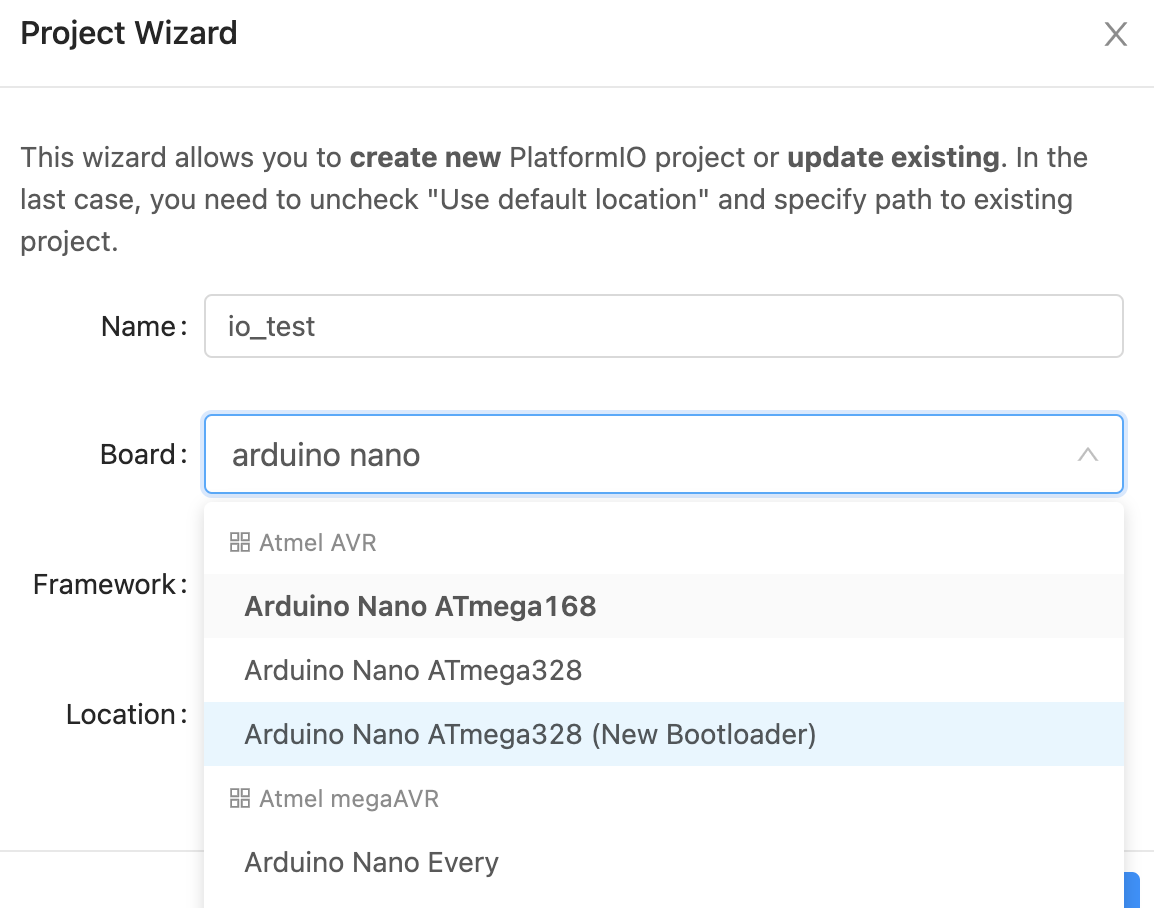
In resulting pop-up window, name the project io_test. In the “board” field, type arduino nano (Fig. 28(a)).
- :[ ]:
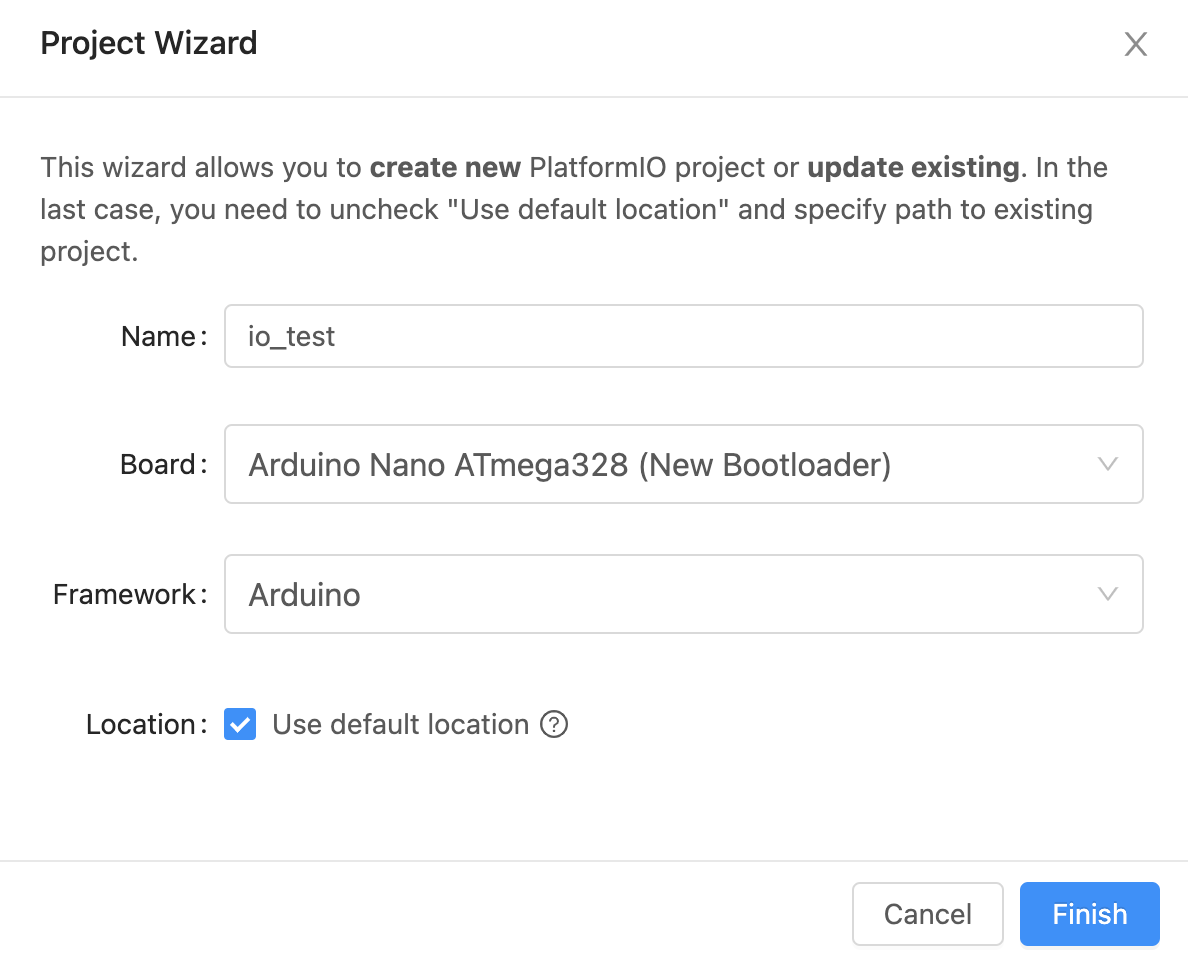
If your Arduino Nano has the old bootloader, then select “Arduino Nano ATmega328”. If your Arduino Nano has the new bootloader, then select “Arduino Nano ATmega328 (New Bootloader)”. After you do so, the “framework” field will auto-populate to “Arduino” (Fig. 28(b)).
- :[ ]:
Click on the “Finish” button. After several seconds, a new project will be ready.

Fig. 28 Selecting board and processor in the Arduino IDE.
a |
b |
|---|---|
|
|
Selecting the board with PlatformIO. |
Ready to create the io_test project |
- :[ ]:
Open the platformio.ini file (it may open automatically).
- :[ ]:
Make a note of the environment name that PlatformIO created automatically for you. If you see
[env:nanoatmega328]then then environment name isnanoatmega328. If you see[env:nanoatmega328new]then then environment name isnanoatmega328new.- :[ ]:
Without removing anything from your platformio.ini file, add the following to your platformio.ini file, replacing
▶environment_name◀with the environment name that PlatformIO created automatically for you (see Fig. 29):[platformio] src_dir = .pio/libdeps/▶environment_name◀/CowPi/examples/io_test [env] lib_deps = docbohn/CowPi @ ^0.6.0 docbohn/CowPi_stdio @ ^0.6.0 monitor_echo = yes
This will instruct PlatformIO to use the CowPi and CowPi_stdio libraries, and it instructs PlatformIO to compile the CowPi library’s io_test example instead of anything in the src/ directory.

Fig. 29 Configuring the PlatformIO project to use the CowPi and CowPi_stdio libraries, and to compile the io_test example.
- :[ ]:
Save platformio.ini.
- :[ ]:
Open your IDE’s Serial Monitor.
- :[ ]:
Compile and upload io_test to your Arduino Nano in the same manner that you did for MyBlink.
After io_test has been uploaded to your Arduino Nano, hou will see this message in your IDE’s Serial Monitor:
CowPi library version 0.6.0
The simple I/O test will print the status of the keypad and of each
    button, switch, and LED every time there is a change.

Keypad:      -        Column pins:  1111
Left switch: RIGHT    Right switch: RIGHT
Left button: UP       Right button: UP
Left LED:    OFF      Right LED:    OFF
For now, no other output is possible.
After the test code is loaded, proceed to Install the Slide Switches.